About us
 HAIR EXTENSIONS
 BEST SELLING PRODUCTS
 Wig Hair
 WHOLESALE PRICE
 Contact us
Embarking on the journey of donning a wig can be a thrilling experience, whether you’re experimenting with a new look or stepping into the world of cosplay. Yet, the key to achieving a seamless and natural appearance lies in the foundation – the often underestimated wig cap. A well-fitted and properly positioned wig cap not only ensures comfort but also serves as the canvas upon which your chosen wig will work its magic. In this comprehensive guide, we’ll take you through the step-by-step process of how to put on a wig cap with finesse. Get ready to elevate your wig-wearing experience to new heights!
I. What is A Wig Cap?

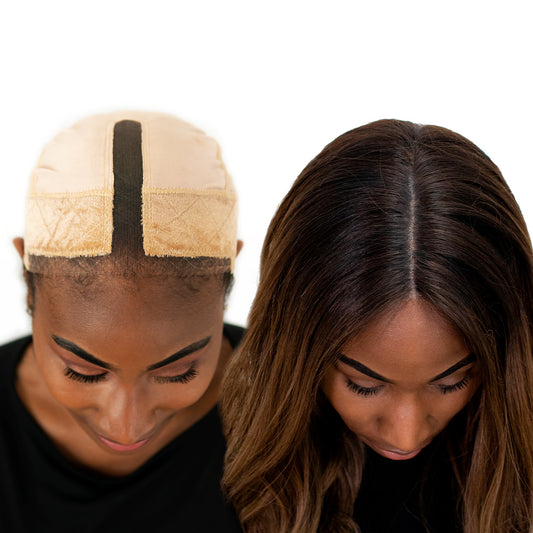
A wig cap is a stretchy, close-fitting cap that is worn on the head to secure and provide a base for wigs. It is typically made of a thin, breathable material, such as nylon, bamboo viscose, or mesh, which allows air circulation and helps to keep the scalp cool. The primary purpose of a wig cap is to hold the natural hair in place and create a smooth surface for the wig to be placed over. Wig caps come in various styles, including close-fitting caps, open-top caps, and full-cap designs. Some are designed to match the wearer’s skin tone, while others are transparent or come in neutral colors.
II. Why Do You Need A Wig Cap?
To wear, or not to wear? That is the question.
Wearing is a completely personal preference. Wig caps act as a protective barrier to a sensitive scalp. Wearing it can help prevent the wig from shifting during everyday use, provide a more comfortable fit, and protect the natural hair underneath. Additionally, wig caps can contribute to a more natural look by creating a seamless transition between the wig and the scalp. If wearing it helps you achieve this, then this is the way to go. If though, the wig cap doesn’t suit your needs and doesn’t provide you with any added benefit, then put the wig cap back in its cellophane and leave it alone.
III. Wig Cap: Pros and Cons
Wig caps are not expensive items, so we would advise that you buy a pack and see if they work for you. Let’s see its pros and cons for those with complete hair loss and partial or no hair loss:
1. For Those with Complete Hair Loss:
Pros:
- The cap can provide a protective barrier and protect against that scratchy and uncomfortable feeling on your scalp.
- A wig cap will give you an extra layer of comfort if you have a sensitive scalp. Depending on what wig construction you opt for, the extra layer that a wig cap provides will ensure that your scalp can breathe and doesn’t become irritated by the direct contact of a wig.
- Helps to prevent the wig itself from slipping.
Cons:
- Some wig wearers comment that a wig cap can feel warm and, combined with the weight of a wig, this heat can feel uncomfortable. As many wig caps are made from nylon liners, this fabric can sometimes react with the skin and cause the scalp to sweat more than usual.
2. For Those With Partial Or No Hair Loss:
Pros:
- Wig caps are a handy tool to keep your natural hair under wraps.
- Wig caps are great for flattening your natural hair and keeping it as close to your scalp as possible so that your wig will look completely natural with no visible lumps and bumps.
Cons:
- Wig caps can make their heads feel warm and a bit sweaty.
- Wig caps can sometimes feel a bit restrictive and give them a bit of a headache if worn too long.
IV. How To Put On A Wig Cap Like A Pro?
This brings us to the important part. Let’s see the items you’ll need to get started and our steps below.
What You’ll Need to Put on A Wig Cap:
- Wig cap (that has a good color match)
- Bobby pins (optional)
- Hair ties (optional)
- Scalp protector spray (optional)
How To Put On A Wig Cap Step #1: Apply Protector Spray (Optional)
Firstly, you may want to spray your scalp with some protector spray – this is optional, but some find that the spray helps to minimize scalp irritation, particularly if you have a sensitive scalp. You can purchase scalp protector spray from most pharmacies and supermarkets.
Step #2: Choose Your Wig Cap

Wig caps typically come in nude or black, but you can find wig caps in various shades and different sizes too. We advise choosing a cap that matches your skin tone or is as close as possible. Alternatively, you could choose a cap that is similar to the root color of the wig you’ll be wearing. This means that if your wig moves on your head, it will be less noticeable.
Step #3: Prepare Your Head for Applying a Wig Cap
The process of applying will differ depending if you have longer hair, a small amount of hair, or no hair.
- If you do have hair: you need to figure out the best way to keep your hair flat on your head. You could try plaiting a cornrow braiding style. Split your hair into 4 sections and create 4 braids. This works for hair of any length, if your hair is longer, wrap the extra braided hair around your head and hold it down with some bobby pins.
- If you have a bald scalp: it is more straightforward as you don’t have to worry about smoothing and concealing hair underneath it.
Step #4: Put On and Align Your Wig Cap

Once you’re ready, put it on your head and align it with your natural hairline as accurately as possible. This is a crucial step if you want the most realistic finish. Then, simply stretch the wig cap towards the back of your head and your nape until it feels secure and comfortable. Don’t forget to tuck the cap behind your ears so it doesn’t cover them up.
Step #5: Secure Your Wig Cap
Many wig wearers are comfortable wearing on its own, however, if you would like more security, you can always slide some bobby pins around the edges. Just make sure it’s not too tight! This is also the time to check for any flyaway hairs sticking out from the edges of your wig cap. Carefully tuck them back underneath your wig cap to conceal them.
Step #6: Put On Your Wig
Once your wig cap is securely in place, it’s time to put on your wig! Place your wig on top of the wig cap, aligning it with your natural hairline. However, if you have a lace front wig, you should line it up approximately half an inch or so from your hairline instead. When you’re happy with the positioning of your wig, you need to secure it into place.

CHECK THIS OUT: Tips For Beginners: How To Wear Wigs?
V. Conclusion
Once you mastered these 6 steps and you are one step closer to transforming your confidence with your fabulous new wig. With practice and patience, it will become a seamless part of your routine, ensuring a comfortable and secure foundation for your wig, and allowing you to rock your favorite styles with confidence!